Tuesday, April 3, 2018

Cooking Bannock Bread


As many of you know our family is involved in Scouting. Sam is in Beavers and Tyler is a Cub now. Simon and I are Scouters in both sections this year. With that we need to up our knowledge of all things Scouting. You know what they say - Once a Scout- always a pyromaniac!


Along with learning fire skills I want to learn good techniques for making Bannock bread.

I want the kids to be able to make their own bread using individual clay pots. The best thing to do is test out the activity - just to make sure it will work, or to make any adjustments in advance.


 I always wanted to see if steel wool really aught fire that easily. yes, yes it does!

So we did not use a chimney to start our briquettes - the first attempt. It starts, it gets hot, but not hot enough or quick enough.


I cleaned the pots, greased them up and placed tin foil in the bottom. I decided to chuck the foil and do without it. Which was fine, it cooked well, no issues. Its not like we placed the pots in the fireplace directly.

Simon found a recipe on allrecipes.com for bannock bread. Add water and melted butter.


Put it all in a ziplock bag, mush around for a while, let it rest for a bit...


Put them in the pots, cover and cook.


at first I thought it would take 20 minutes, but it was more like 40 minutes. Next time they will not be so big.


We did not have a chimney for briquette starters, we will shortly. So we had to improvise, a metal empty coffee can worked well for our second attempt. The coals got real nice and hot.


It was super easy

As you can see the bread slips out really easily (notice the wine - at a Scouting event there is no alcohol - hence why we test at home!)


And VOILA! Bread cooked in my driveway. YUUUUMMMMMMMYYYY

Sunday, November 5, 2017

Getting things done!


So now that we have a plan, it is time to complete a few items on that list. Sunday morning we finished the winter jacket. The only remaining thing today was the hood. This we will worked on today. It is satisfying to get this project completed!

 Now it can snow and get super cold, I am ready!


I am so happy that we were able to complete this without too much struggle. The 2nd, 3rd jacket really takes much less time and effort!


I also found a pair of pants for Tyler that needed to be shortened. Ty does not do buttons, it is very hard for him. He simply refuses. Finding a pair of pants that have an elastic waistband is impossible in size 10 and up. So I better shorten these before he grows out of them!

It was a quick and satisfying project. For his pants I went to Value Village and bought a few pairs. I cannot justify paying $30+ on a pair that he will ruin in about 2 weeks time. I also found some funky Zombie Crossing long sleeve shirts that he loves. I also snagged a zippered jacket from the gap that was brand new! The pockets were still sewed up. A few items crossed off my sewing list! I only need to sew PJ bottoms now. A trip to Club Tissue with Simon meant about 6 more PJ projects. OOPS!

Wednesday, November 1, 2017

Goal Setting: Sewing projects for Fall 2017

Sometimes it helps to set goals, to put pen to paper, and to commit to it! After we finish up my jacket this week I want to finish Simon's pants, sew Tyler some PJ bottoms and make him some sweat pants. Then to sew Simon's winter jacket!

My jacket will be done by Sunday this week.

Simon's pants: Give me 2 weeks

Ty's PJs and pants: One weekend afternoon.

My snow pants from a sewing course that I NEVER finished (From 2014!)


 For Tyler's pants Jalie 3355 is a good choice. I need to make the next size up so I will have to retrace the pattern. The pockets have a nice topstitching detail, so I can funk it up with topstitching details.


For Tyler's PJ bottoms I will use my old pattern Simplicity 9499. Again, I will need to trace the next size up.


I need to finish my snow pants from 2014, I play a lot in the snow and I need pants that fit! I used Jalie 2109 in a sewing course and we left the last few steps not done.
My Snow pants: Not finished yet!


I feel that if we had 1 more week of classes after the last class we would get more completed. Often I have questions during the last stages of completion. And there are a lot of last minute questions and fitting issues during the class that I feel rushed. Like in my pants class I never did my pair of pants. There was too much chitter chatter and fitting issues. I gave up. And now I gain a few pounds, so it is a moot point since I did my pattern. 

Wish me luck!

Thursday, October 26, 2017

Winter Jacket Course 2017

I am taking the winter jacket course again with Mme Dorothee Barnes at Club Tissus in Laval. Simon and I originally took the course together in 2013. We both made our own winter jackets, and we still wear them to this day (Ok, not today as it is UNUSUALLY HOT this late October, but you understand what I mean!) You can see My Jacket and Simon's Jacket here.

We were so happy with the process that we bought all the materials to make me a long red jacket. We planned on making a version of Kanuk's Blainville jacket, but longer. Guess what happened? Yup, you guessed it. It went in the stash pile. I stored everything in a Rubbermaid bin.

So enter 2017, 4 years later. I signed Simon and I up for the course. We ended up with only me taking the course. With Simon starting a new job that finished much later and a strain on babysitting, it is only me.

It is much easier on the time budget working only on one coat at a time!

Image result for jalie 2108


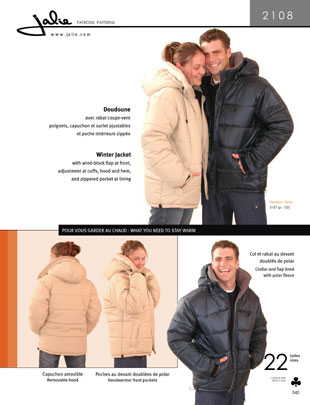
We used Jalie 2108 as the base model for the jacket. We added princess seams, changed the collar, the width, the length, just about everything! I wanted a nice long jacket for when I wear skirts to work. Something sleek with not much details. I added a band in the front middle for details.

I am now stuck on the hood. We have decided to purchase removable fur like in the picture above. We are not sure if we want to add a drawstring to the hood, and we are waiting on the color of the fur to decide the color of our polar blizzard fleece for the collar. Other than that after this week's class I will be done!


Here is the exterior shell. I created the princess seams and sewed the pockets in the seams. I added a horizontal band for detail.

You can see the exterior portion of collar was made with exterior nylon and 200g earthwrap.


As you can see the pockets do not lay flat. What we ended up doing was to see a piece of fabric from the pocket to the edge. That way the pocket stays in place. A small detail but trust me in the end it makes a big difference!


Here is the back of the jacket: the collar and zipper shield


The shield is 5cm longer than the zipper.


The interior lining with the 200g Earthwrap insulation does not look like much. I attached the polar fleece for the collar to the lining.

The inside is much nicer to look at. I added a jupette, not a drawstring.

I HATE attaching the jupette and then the zipper. So we added snaps directly on the facing.

Another detail is to add a hook to hang up your jacket.


Here is where I am with the hood. I attached the zipper but I did not sew the interior tot he exterior shell.

I am not adding a drawstring or side shields on this hood.


I am adding removable fur to the hood collar. I need the sew a shield with snaps to add to the fur, and snaps to the hood portion as well. To do this I need to go to the fabric store and use their snap press. So I have to wait to sew up the hood to do this.


This is the first time we use the magnetic snaps. A word of caution: Make sure your flap is wide enough, or else you will be cursing when you sew your lining to the exterior.

I added the duct tape to the shoulder seams. This will make it even more waterproof during those nasty storms. And no, it will not come off. We don't have regular duct tape, but we have the tape used on the exterior of the house, so you KNOW it will stick!


Here you can see the flap that Simon sewed on the pockets to keep them in place.

That added detail makes the lines of the jacket more professional and less homemade.


It was very difficult to sew the arms. I can't explain how we sewed the the lining and the exterior together, Our first attempt we ended up with the two sewed up so that we could not put on the jacket. OOPS.
I brought up a YouTube video and then it made sense. You have to go from the bottom, pull it out and place the right sides together.


I am a visual person, so don't ask me what we did, but it worked!

It is a good thing that we have the Janome MC 8200. There is a lot if room to the right of the presser foot. Otherwise it would have been pretty cramped!

Now all we have left is the bottom, turn it out, sew up the side arm seam, topstitch and finish the hood (snaps for fur, etc)


A trick Simon used when sewing the cuffs was he pre-twisted the jacket so that as he sewed the jacket unwound instead of twisting. It made it move easier under the machine. 

So off to Club Tissue to use their snap machines. Now I say bite the bullet, buy 2 snap machines, be done with it and install them in your house. One for the top, one for the bottom rivets. No need to change the bits. Why spend the money you ask? Have you ever been to a fabric store and not spent money? What we spent today on material for yet more projects I could have easily bought 2 machines and bits. 

Ok snow I am ready!


Thursday, May 11, 2017

Cub Scout Thank you cards and a Mother's Day Card.


I bought the new Cricut Explore Air 2 machine. Here is my first project, a Mother's Day card from is to My Mom. We are very pleased with the results.
 It was really quick and easy. The first time we used it we did not know that there were 2 types of mats. A sticky one, and a less sticky one for paper. Now we know, lol!
 It even cut out the envelope, so cool!

Then I got out my laminator and made these cool labels. Our Scouting year is coming to an end. I found these cool labels for Cub Scouts and printed them off and plasticized them.

These will be for my fellow Beaver Scouters. My youngest saw this box and keeps trying to eat them!

Here is the card I printed off. There is a song the kids sing when it is taking too long :

HEY AKELA, HOW MUCH LONGER? HEY AKELA, HOW MUCH LONGER? HEY AKELA, HOW MUCH LONGER? HEY AKELA, HOW MUCH LONGER? HEY AKELA, HOW MUCH LONGER?

Non stop, can get grating, lol

And here is the inside....